0x01 简介
Seafile 是一款开源、安全、高性能的开源网盘,提供了主流网盘所具有的功能,包括文件同步、文件共享等,解决文件集中存储、共享和跨平台访问等问题,还提供了高级的安全保护功能以及群组协作功能,支持跨平台,其他百度…
官方地址
https://www.seafile.com
0x02 安装
本文安装的 Seafile 企业版,默认有3个免费的无功能/时间限制的试用账户,个人用足够了!!!
虽然图是旧的,但内容是新的,于 2023年02月28日 正常部署
准备
本次部署系统环境 Ubuntu22.04,后面操作均在 root 下操作
- 主机IP:
192.168.6.128 - 域名:
seafile.hello.com
添加 HOSTS 解析
echo '192.168.6.128 seafile.hello.com' >/etc/hosts
安装 docker 有就跳过
curl -fsSL https://get.docker.com | bash -s docker --mirror Aliyun
安装 docker-compose 有就跳过
curl -L "https://github.com/docker/compose/releases/download/v2.15.1/docker-compose-$(uname -s)-$(uname -m)" -o /usr/local/bin/docker-compose

# 赋予权限
chmod +x /usr/local/bin/docker-compose

# 镜像加速,复制执行
mkdir -p /etc/docker
cat<<-'EOF'>/etc/docker/daemon.json
{
  "registry-mirrors": [
    "https://ustc-edu-cn.mirror.aliyuncs.com"
  ]
}
EOF
优化内核参数,复制执行
modprobe br_netfilter
cat<<-'EOF'>>/etc/sysctl.conf
net.bridge.bridge-nf-call-ip6tables = 1
net.bridge.bridge-nf-call-iptables = 1
EOF

# 应用
sysctl -p
启动并自启
systemctl daemon-reload
systemctl enable --now docker
其他关于 Docker 的使用,可参考 点击前往
安装
创建所需目录
mkdir -p /opt/seafile && cd $_
导入 docker-compose.yml 复制执行
cat<<-'EOF'>docker-compose.yml
version: '3.0'
services:
  db:
    image: mariadb:10.5
    container_name: seafile-mysql
    restart: on-failure
    environment:
      - MYSQL_ROOT_PASSWORD=${MYSQL_ROOT_PASSWORD}
      - MYSQL_LOG_CONSOLE=true
    volumes:
      - ${MYSQL_DATA}:/var/lib/mysql
    networks:
      - seafile-net

  memcached:
    image: memcached:1.6.0
    container_name: seafile-memcached
    entrypoint: memcached -m 256
    restart: on-failure
    networks:
      - seafile-net

  elasticsearch:
    image: elasticsearch:7.16.2
    container_name: seafile-elasticsearch
    restart: on-failure
    environment:
      - discovery.type=single-node
      - bootstrap.memory_lock=true
      - xpack.security.enabled=false
      - "ES_JAVA_OPTS=-Xms1g -Xmx1g"
    volumes:
      - ${ES_DATA}:/usr/share/elasticsearch/data
    networks:
      - seafile-net

  seafile:
    image: docker.seafile.top/seafileltd/seafile-pro-mc:latest
    container_name: seafile
    restart: on-failure
    ports:
      - 80:80
      - 443:443
    volumes:
      - ${SEAFILE_DATA}:/shared
    environment:
      - DB_HOST=db
      - DB_ROOT_PASSWD=${MYSQL_ROOT_PASSWORD}
      - TIME_ZONE=Asia/Shanghai
      - SEAFILE_ADMIN_EMAIL=${ADMIN_EMAIL}
      - SEAFILE_ADMIN_PASSWORD=${ADMIN_PASSWORD}
      - SEAFILE_SERVER_LETSENCRYPT=${SERVER_LETSENCRYPT}
      - SEAFILE_SERVER_HOSTNAME=${SERVER_HOSTNAME}
    depends_on:
      - db
      - memcached
      - elasticsearch
      - oods
    networks:
      - seafile-net

  oods:
    image: onlyoffice/documentserver:latest
    container_name: seafile-oods
    restart: on-failure
    volumes:
      - ${OODS_DATA}:/var/www/onlyoffice/Data
    networks:
      - seafile-net
    environment:
      - JWT_ENABLED=true
      - JWT_SECRET=your-secret-9144affdbc2e

networks:
  seafile-net:
EOF
导入环境文件 .env 要改的信息在这里改,复制执行
cat<<-'EOF'>.env
MYSQL_ROOT_PASSWORD = qwe123qwe          # 数据库 ROOT 的密码
MYSQL_DATA          = /opt/seafile/seafile-mysql/db            # 数据库数据
ES_DATA             = /opt/seafile/seafile-elasticsearch/data  # ES 数据
SEAFILE_DATA        = /opt/seafile/seafile-data                # Seafile 数据
OODS_DATA           = /opt/seafile/seafile-oods/data           # OnlyOffice 数据
ADMIN_EMAIL         = admin@hello.com    # 设置管理员账号邮箱
ADMIN_PASSWORD      = qwe123qwe          # 设置管理员账号密码
SERVER_HOSTNAME     = seafile.hello.com  # 你的域名
SERVER_LETSENCRYPT  = false              # 是否自动申请证书,是就 true
EOF
创建所需目录
mkdir -m 777 -p /opt/seafile/seafile-elasticsearch/data
mkdir -p /opt/seafile/{seafile-mysql,seafile-data,seafile-oods}
创建好了的目录
$ ls -la
...
-rw-r--r-- 1 root root  667 Feb 28 09:14 .env
-rw-r--r-- 1 root root 1915 Feb 28 09:14 docker-compose.yml
drwxr-xr-x 2 root root 4096 Feb 28 09:15 seafile-data
drwxr-xr-x 3 root root 4096 Feb 28 09:15 seafile-elasticsearch
drwxr-xr-x 2 root root 4096 Feb 28 09:15 seafile-mysql
drwxr-xr-x 2 root root 4096 Feb 28 09:15 seafile-oods
要确保磁盘有足够多的空间,不然也是没法启动!!!至少要有 10G 硬盘
...no space left on device...
启动,我千兆带宽,5分钟就好了…
docker-compose pull
docker-compose up -d
如果硬盘不够,你又是虚拟机,可使用 LVM 扩容
LVM 扩容
关机,新加硬盘,比如 /dev/sdb
$ lsblk
NAME                      MAJ:MIN RM SIZE RO TYPE MOUNTPOINTS
sda                         8:0    0  30G  0 disk
├─sda1                      8:1    0   1M  0 part
├─sda2                      8:2    0   2G  0 part /boot
└─sda3                      8:3    0  28G  0 part
  └─ubuntu--vg-ubuntu--lv 253:0    0  14G  0 lvm  /
sdb                         8:16   0  20G  0 disk  # 新加的 20G 硬盘
扩容卷组(VG)
$ vgs
  VG        #PV #LV #SN Attr   VSize   VFree
  ubuntu-vg   1   1   0 wz--n- <28.00g  14.00g  # 原来14G
$ vgextend ubuntu-vg /dev/sdb                   # 扩容20G
$ vgs
  VG        #PV #LV #SN Attr   VSize  VFree
  ubuntu-vg   2   1   0 wz--n- 47.99g <34.00g   # 变成34G了
然后扩容逻辑卷(LV)
$ lvs
  LV        VG        Attr       LSize   Pool Origin Data%  Meta%  Move Log Cpy%Sync Convert
  ubuntu-lv ubuntu-vg -wi-ao---- <14.00g        # 原来14G
$ lvextend -L +20G -r /dev/ubuntu-vg/ubuntu-lv  # 扩容20G
$ lvs
  LV        VG        Attr       LSize   Pool Origin Data%  Meta%  Move Log Cpy%Sync Convert
  ubuntu-lv ubuntu-vg -wi-ao---- <34.00g        # 变成30G
查看磁盘空间,确实变了
$ df -h
Filesystem                         Size  Used Avail Use% Mounted on
tmpfs                              389M  1.1M  388M   1% /run
/dev/mapper/ubuntu--vg-ubuntu--lv   34G  8.1G   24G  26% /          # 在这里
tmpfs                              1.9G     0  1.9G   0% /dev/shm
tmpfs                              5.0M     0  5.0M   0% /run/lock
/dev/sda2                          2.0G  247M  1.6G  14% /boot
tmpfs                              389M  4.0K  389M   1% /run/user/1000
有问题看日志
docker-compose logs -f
开放端口
firewall-cmd --zone=public --add-port=80/tcp --permanent
firewall-cmd --zone=public --add-port=443/tcp --permanent
firewall-cmd --reload
查看运行状态
$ docker-compose ps
NAME                    COMMAND                  SERVICE             STATUS              PORTS
seafile                 "/sbin/my_init -- /s…"   seafile             running             0.0.0.0:80->80/tcp, :::80->80/tcp, 0.0.0.0:443->443/tcp, :::443->443/tcp
seafile-elasticsearch   "/bin/tini -- /usr/l…"   elasticsearch       running             9200/tcp, 9300/tcp
seafile-memcached       "memcached -m 256"       memcached           running             11211/tcp
seafile-mysql           "docker-entrypoint.s…"   db                  running             3306/tcp
seafile-oods            "/app/ds/run-documen…"   oods                running             80/tcp, 443/tcp
可以看到,5个服务都起来了~
等待几分钟,第一次运行会进行初始化
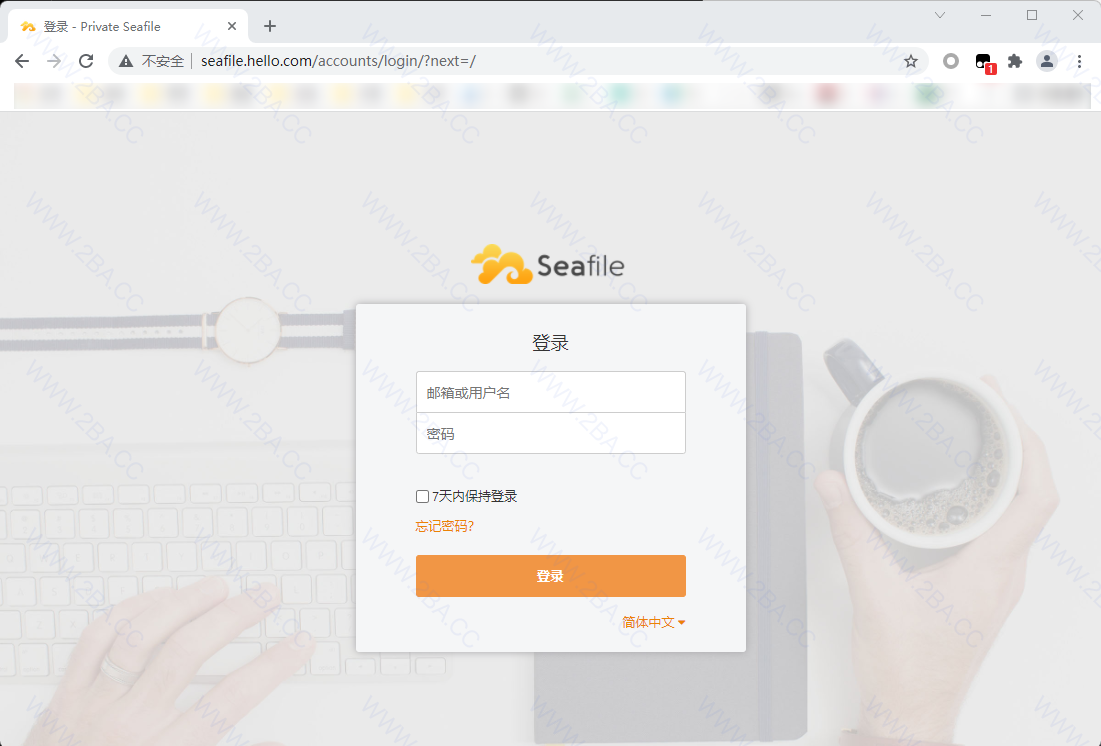
http://seafile.hello.com
用户名/密码就是 docker-compose.yml 中配置的
admin@hello.com
qwe123qwe
0x03 配置
…
授权文件
如果已经购买专业版的,把授权文件拷贝到 seafile 目录下
cp seafile-license.txt /opt/seafile/seafile-data/seafile/
重启容器即可完成授权文件的安装
docker-compose restart seafile
全文检索
默认已经开启全文检索,每10分钟更新一次索引,你也可以手动更新索引
docker-compose exec -it seafile /bin/bash -c "./seafile-pro-server-9.0.14/pro/pro.py search --update"
然后就可以里面搜索得到了
配置证书
设置自动获取 Let's encrypt SSL 证书,就跳过该步骤了!!!
- SEAFILE_SERVER_LETSENCRYPT=true
手动设置
创建所需目录
mkdir -m 777 -p /opt/searfile/seafile-data/ssl && cd $_
创建服务器私钥
openssl genrsa -out server.key 2048
创建证书签名请求 (CSR)
openssl req -new -key server.key -out server.csr
使用私钥和 CSR 签署证书
openssl x509 -req -days 365 -in server.csr -signkey server.key -out server.crt
合并两个文件,将 server.key 追加到 server.crt
cat server.key >> server.crt
完整配置如下,导入 Nginx 配置(全部复制执行即可)
cat<<-'EOF'>/opt/seafile/seafile-data/nginx/conf/seafile.nginx.conf
map $http_x_forwarded_proto $the_scheme {
    default $http_x_forwarded_proto;
    "" $scheme;
}

map $http_x_forwarded_host $the_host {
    default $http_x_forwarded_host;
    "" $host;
}

map $http_upgrade $proxy_connection {
    default upgrade;
    "" close;
}

server {
    listen 80;
    listen 443 ssl;
    server_name seafile.hello.com; # 你的域名
    server_tokens off;

    ssl_certificate /shared/ssl/server.crt;
    ssl_certificate_key /shared/ssl/server.key;
    ssl_session_timeout 5m;
    ssl_session_cache shared:SSL:5m;
    ssl_protocols TLSv1.1 TLSv1.2;
    ssl_prefer_server_ciphers on;

    proxy_set_header X-Forwarded-For $remote_addr;
    add_header Strict-Transport-Security "max-age=31536000; includeSubDomains";
    client_max_body_size 1024m;

    location / {
        proxy_pass http://127.0.0.1:8000/;
        proxy_read_timeout 310s;
        proxy_set_header Host $host;
        proxy_set_header Forwarded "for=$remote_addr;proto=$scheme";
        proxy_set_header X-Forwarded-For $proxy_add_x_forwarded_for;
        proxy_set_header X-Forwarded-Proto $scheme;
        proxy_set_header X-Real-IP $remote_addr;
        proxy_set_header Connection "";
        proxy_http_version 1.1;

        access_log      /var/log/nginx/seahub.access.log seafileformat;
        error_log       /var/log/nginx/seahub.error.log;
    }

    location /seafhttp {
        rewrite ^/seafhttp(.*)$ $1 break;
        proxy_pass http://127.0.0.1:8082;
        proxy_set_header X-Forwarded-For $proxy_add_x_forwarded_for;
        proxy_connect_timeout   36000s;
        proxy_read_timeout      36000s;
        proxy_request_buffering off;

        access_log      /var/log/nginx/seafhttp.access.log seafileformat;
        error_log       /var/log/nginx/seafhttp.error.log;
    }

    location /seafdav {
        proxy_pass         http://127.0.0.1:8080;
        proxy_set_header   Host $host;
        proxy_set_header   X-Real-IP $remote_addr;
        proxy_set_header   X-Forwarded-For $proxy_add_x_forwarded_for;
        proxy_set_header   X-Forwarded-Host $server_name;
        proxy_set_header   X-Forwarded-Proto $scheme;
        proxy_read_timeout 1200s;

        access_log      /var/log/nginx/seafdav.access.log seafileformat;
        error_log       /var/log/nginx/seafdav.error.log;
    }

    location /media {
        root /opt/seafile/seafile-server-latest/seahub;
    }

    # For letsencrypt
    location /.well-known/acme-challenge/ {
        alias /var/www/challenges/;
        try_files $uri =404;
    }

    location /onlyofficeds {
        proxy_pass http://oods/;
        proxy_http_version 1.1;
        proxy_read_timeout 3600s;
        proxy_connect_timeout 3600s;
        proxy_set_header Upgrade $http_upgrade;
        proxy_set_header Connection $proxy_connection;
        proxy_set_header X-Forwarded-Host $the_host/onlyofficeds;
        proxy_set_header X-Forwarded-Proto $the_scheme;
        proxy_set_header X-Forwarded-For $proxy_add_x_forwarded_for;

        access_log      /var/log/nginx/onlyofficeds.access.log seafileformat;
        error_log       /var/log/nginx/seaonlyofficeds.error.log;
    }
}
EOF
重启 Nginx
docker exec -it seafile /usr/sbin/nginx -s reload
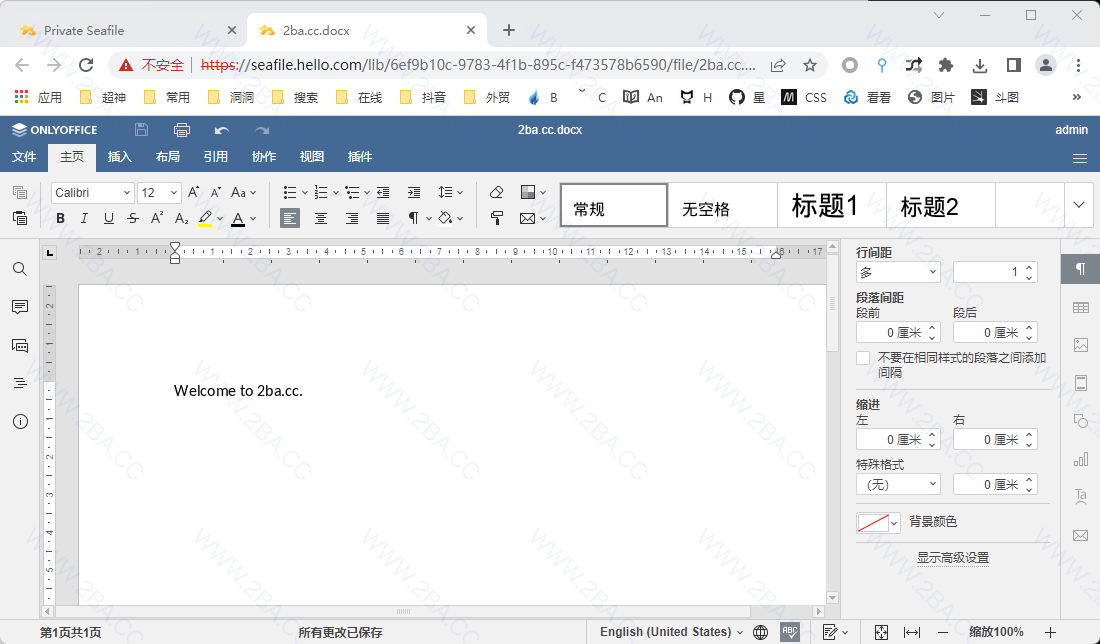
这时候可以通过 https://seafile.hello.com 访问Seafile主页了
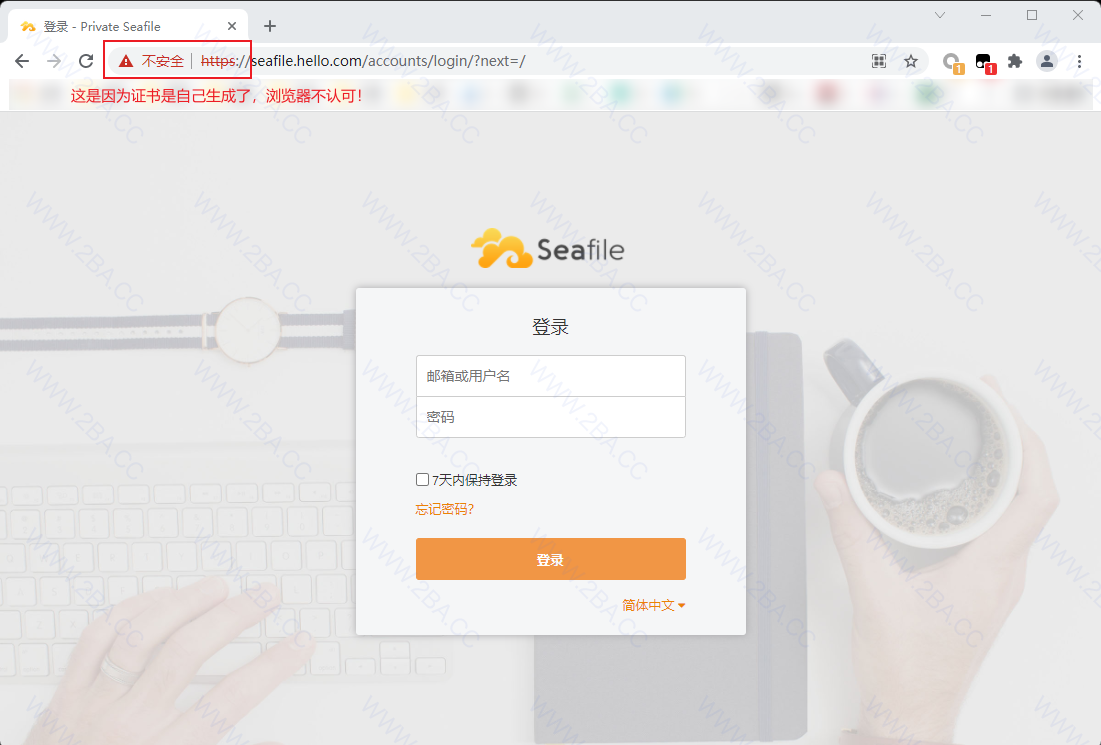
因为证书自己生成的,所以报红了!当然你可以用一些免费的证书
在线预览
编辑 Nginx 配置
vim /opt/seafile/seafile-data/nginx/conf/seafile.nginx.conf
修改完如下
# 这里是新添加的
map $http_x_forwarded_proto $the_scheme {
    default $http_x_forwarded_proto;
    "" $scheme;
}

map $http_x_forwarded_host $the_host {
    default $http_x_forwarded_host;
    "" $host;
}

map $http_upgrade $proxy_connection {
    default upgrade;
    "" close;
}
# 添加结束

server {
    listen 80;

    # ... 原来的 ... 就不复制了 ...

    # For letsencrypt
    location /.well-known/acme-challenge/ {
        alias /var/www/challenges/;
        try_files $uri =404;
    }

    # 这里是新添加的
    location /onlyofficeds {
        proxy_pass http://oods/;
        proxy_http_version 1.1;
        proxy_read_timeout 3600s;
        proxy_connect_timeout 3600s;
        proxy_set_header Upgrade $http_upgrade;
        proxy_set_header Connection $proxy_connection;
        proxy_set_header X-Forwarded-Host $the_host/onlyofficeds;
        proxy_set_header X-Forwarded-Proto $the_scheme;
        proxy_set_header X-Forwarded-For $proxy_add_x_forwarded_for;

        access_log      /var/log/nginx/onlyofficeds.access.log seafileformat;
        error_log       /var/log/nginx/seaonlyofficeds.error.log;
    }
    # 添加结束
}
设置自动保存,复制执行
docker exec seafile-oods sudo sed -i 's,autostart=false,autostart=true,' /etc/supervisor/conf.d/ds-example.conf
导入配置信息,复制执行
cat<<-'EOF'>>/opt/seafile/seafile-data/seafile/conf/seahub_settings.py

# OnlyOffice
ENABLE_ONLYOFFICE = True
VERIFY_ONLYOFFICE_CERTIFICATE = False
ONLYOFFICE_APIJS_URL = 'https://seafile.hello.com/onlyofficeds/web-apps/apps/api/documents/api.js'
ONLYOFFICE_FILE_EXTENSION = ('doc', 'docx', 'ppt', 'pptx', 'xls', 'xlsx', 'odt', 'fodt', 'odp', 'fodp', 'ods', 'fods')
ONLYOFFICE_EDIT_FILE_EXTENSION = ('doc', 'docx', 'ppt', 'pptx', 'xls', 'xlsx')
ONLYOFFICE_JWT_SECRET = 'your-secret-9144affdbc2e'
EOF
重启服务
docker-compose restart oods
重启 Seafile
docker-compose restart seafile
如果你跟我一样用假的域名,没解析的,要在容器里添加 hosts 不然没办法下载到文档的!
docker exec -it seafile-oods /bin/bash -c "echo '192.168.6.133 seafile.hello.com' >> /etc/hosts"
很 OK 查看没问题
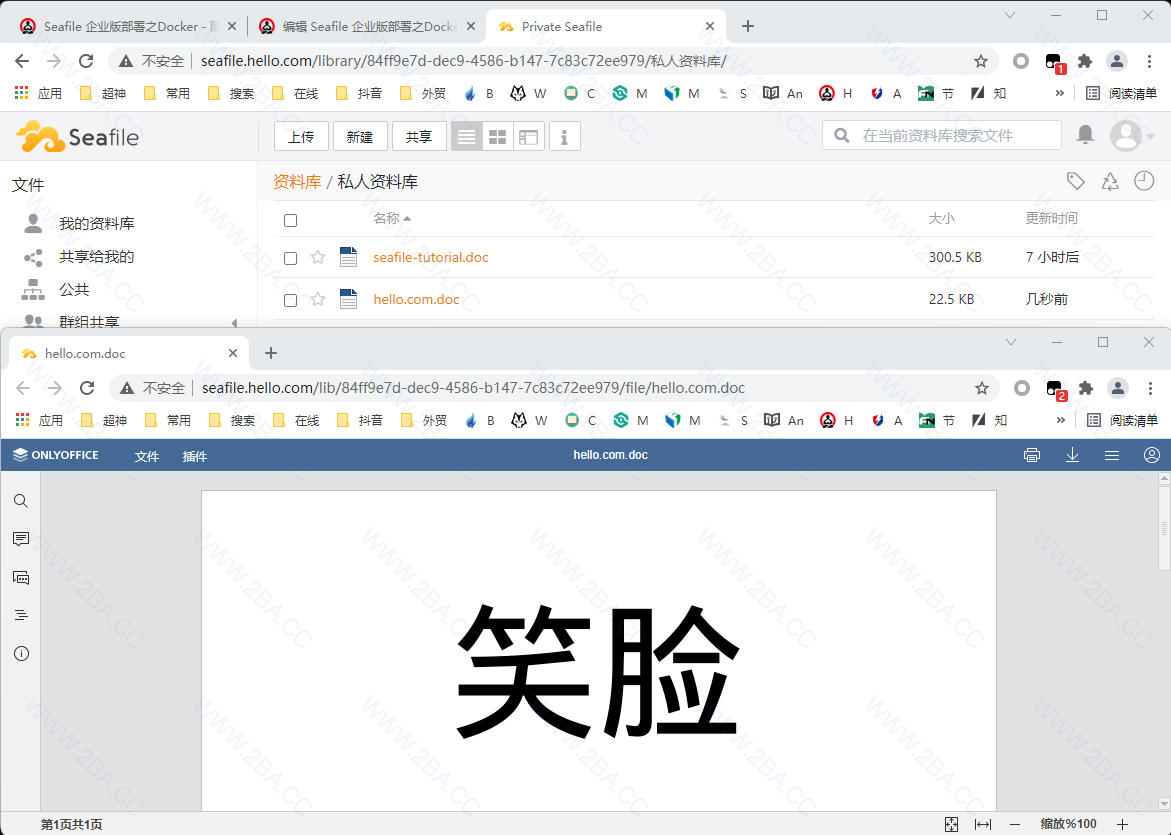
编辑没问题,其他功能均测试全部正常~
有问题就看日志
docker-compose logs -f
0x04 使用
按上面步骤来,基本一步到位,改改名字LOGO,将域名换成你自己的,就可以直接使用了!!!
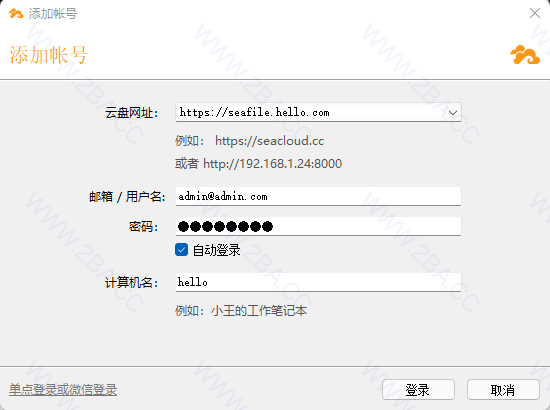
客户端
下载地址
https://www.seafile.com/download/
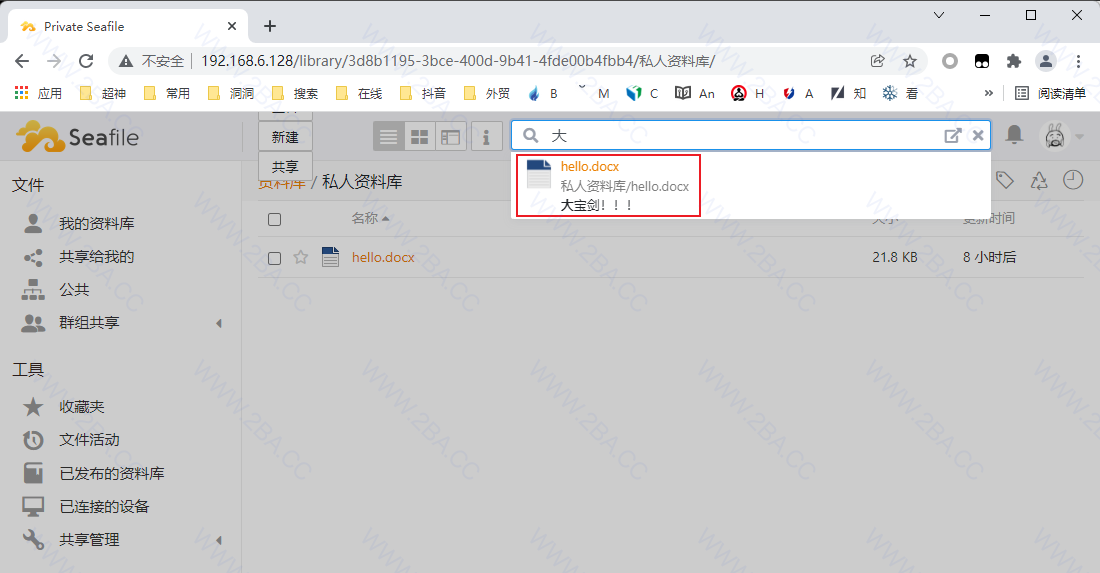
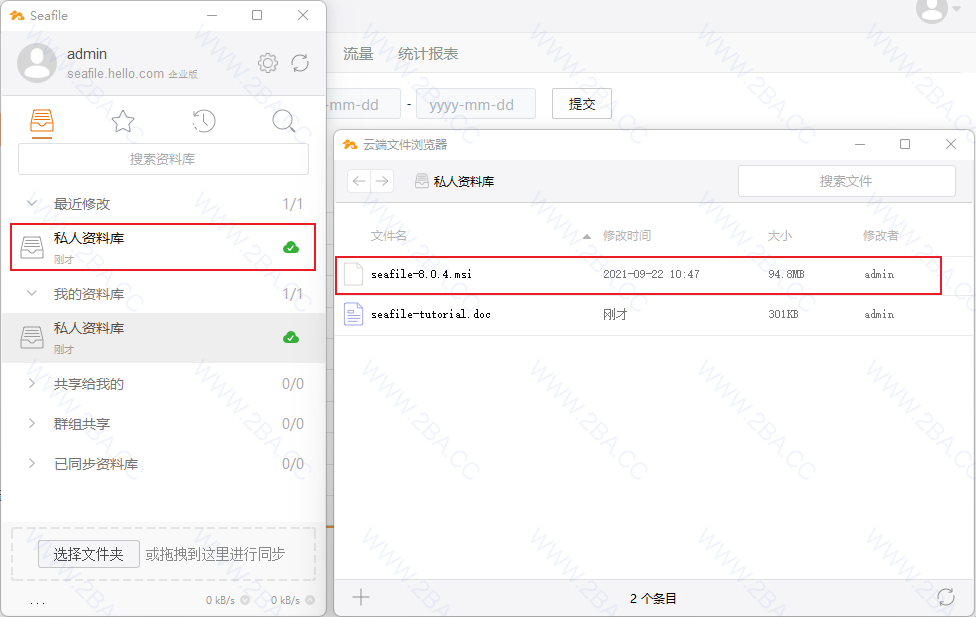
登录
正常上传下载
增加管理员
确保各容器正常运行,执行以下命令
docker exec -it seafile /opt/seafile/seafile-server-latest/reset-admin.sh
根据提示输入用户名和密码就可以创建一个新的管理帐户
$ docker exec -it seafile /opt/seafile/seafile-server-latest/reset-admin.sh
E-mail address: admin@admin.com
Password:         输入密码
Password (again): 再次输入密码
Superuser created successfully.
垃圾回收
在 Seafile 中当文件被删除时,组成这些文件的块数据不会立即删除,需要手动运行
cd /opt
docker-compose exec seafile /scripts/gc.sh
注意:服务会短暂的停止,建议在较空闲的时候使用
升级服务
如果需要升级 Seafile 服务到最新版本
cd /opt/seafile
docker pull docker.seafile.top/seafileltd/seafile-pro-mc:latest
docker-compose down
docker-compose up -d
备份和恢复
备份数据
创建目录
mkdir -p /opt/seafile/seafile-backup/databases/
mkdir -p /opt/seafile/seafile-backup/data/
备份 MySQL 数据库数据
cd /opt/seafile/seafile-backup/databases/

docker exec -it seafile-mysql mysqldump -uroot --opt ccnet_db > `date +%Y%d%m`_ccnet_db.sql
docker exec -it seafile-mysql mysqldump -uroot --opt seafile_db > `date +%Y%d%m`_seafile_db.sql
docker exec -it seafile-mysql mysqldump -uroot --opt seahub_db > `date +%Y%d%m`_seahub_db.sql
备份 Seafile 数据目录
cp -R /opt/seafile/seafile-data/seafile /opt/seafile/seafile-backup/data/
cd /opt/seafile//seafile-backup/data && rm -rf ccnet
或使用 rsync 执行增量备份
rsync -az /opt/seafile/seafile-data/seafile /opt/seafile/seafile-backup/data/
cd /opt/seafile/seafile-backup/data && rm -rf ccnet
恢复数据
恢复数据库
docker cp /opt/seafile/seafile-backup/databases/xxx_ccnet_db.sql seafile-mysql:/tmp/ccnet_db.sql
docker cp /opt/seafile/seafile-backup/databases/xxx_seafile_db.sql seafile-mysql:/tmp/seafile_db.sql
docker cp /opt/seafile/seafile-backup/databases/xxx_seahub_db.sql seafile-mysql:/tmp/seahub_db.sql

docker exec -it seafile-mysql /bin/sh -c "mysql -uroot -p ccnet_db < /tmp/ccnet_db.sql"
docker exec -it seafile-mysql /bin/sh -c "mysql -uroot -p seafile_db < /tmp/seafile_db.sql"
docker exec -it seafile-mysql /bin/sh -c "mysql -uroot -p seahub_db < /tmp/seahub_db.sql"
恢复 Seafile 数据
cp -a /opt/seafile/seafile-backup/data/* /opt/seafile/seafile-data/seafile/
添加病毒扫描
将以下内容添加到 docker-compose.xml 中
services:
  # ...
  av:
    image: mkodockx/docker-clamav:alpine
    container_name: seafile-clamav
    networks:
      - seafile-net
修改 seafile.conf
[virus_scan]
scan_command = clamdscan
virus_code = 1
nonvirus_code = 0
scan_interval = 5
scan_size_limit = 20
threads = 2
重启 Seafile 容器
docker-compose down
docker-compose up -d
0x05 穿透
本来搭的内网,要让外网要访问也简单,直接将 80 或 443 端口穿透出去就行了
花生壳
安装好向日葵客户端
wget "https://down.oray.com/hsk/linux/phddns_5.2.0_amd64.deb" -O phddns_5.2.0_amd64.deb
dpkg -i phddns_5.2.0_amd64.deb
装好后会有提示 SN码 和 密码
 $ phddns status
 +--------------------------------------------------+
 |          Oray PeanutHull Linux 5.2.0             |
 +--------------------------------------------------+
 |              Runstatus: ONLINE                   |
 +--------------------------------------------------+
 |              SN: orayxxxxxxxxxxxx                |
 +--------------------------------------------------+
 |    Remote Management Address http://b.oray.com   |
 +--------------------------------------------------+
使用 SN 码登录到花生壳,并用微信扫描激活
https://console.hsk.oray.com/passport/login
内网穿透,新增映射,配置,映射类型选 HTTPS 输入内网IP 192.168.6.133 端口 80 确定
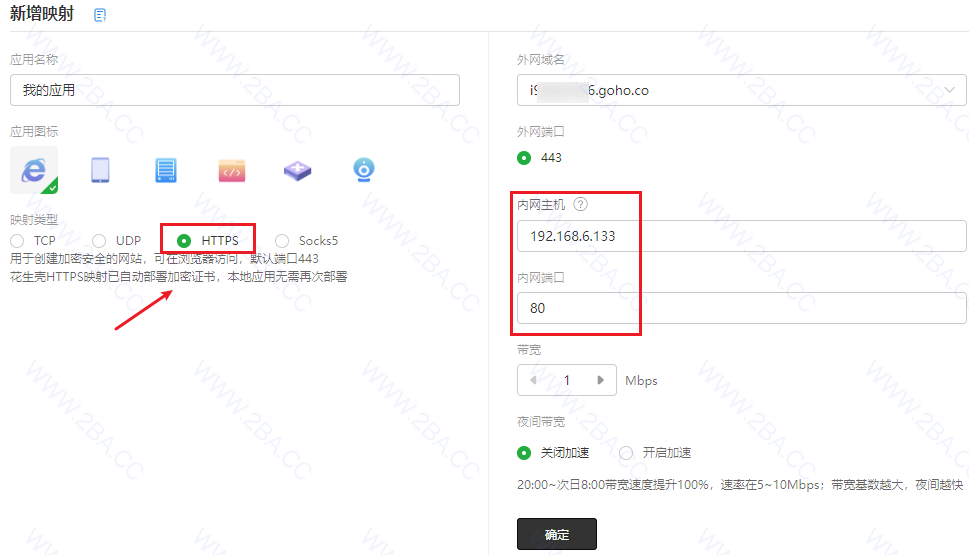
并编辑Nginx的配置,添加 server_name 别名
server_name seafile.hello.com xxx.goho.co
然后在已建立的映射里,点击 诊断,要是客户端离线重新登录花生壳
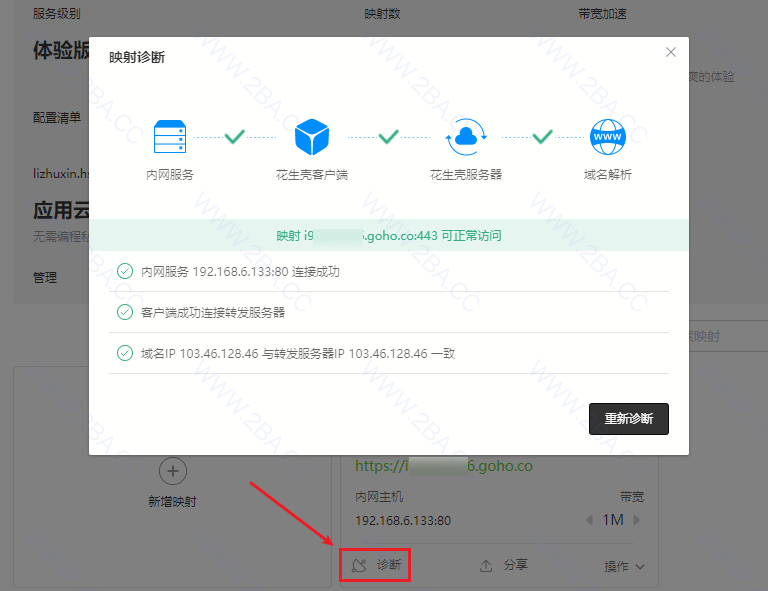
现在使用花生壳到访问地址就可以正常登录了
https://xxx.goho.co/
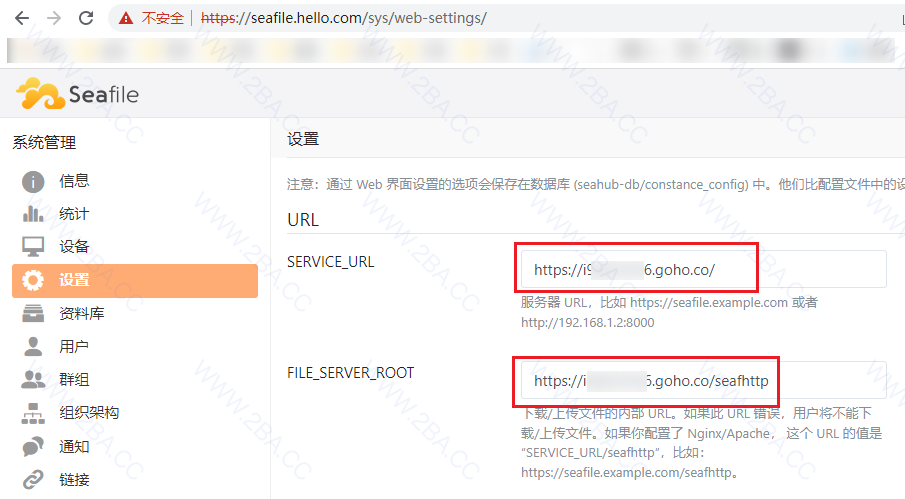
在后台设置里将后台的 SERVICE_URL 和 FILE_SERVER_ROOT 改为映射后的地址就行了
https://xxx.goho.co/
https://xxx.goho.co/seafhttp
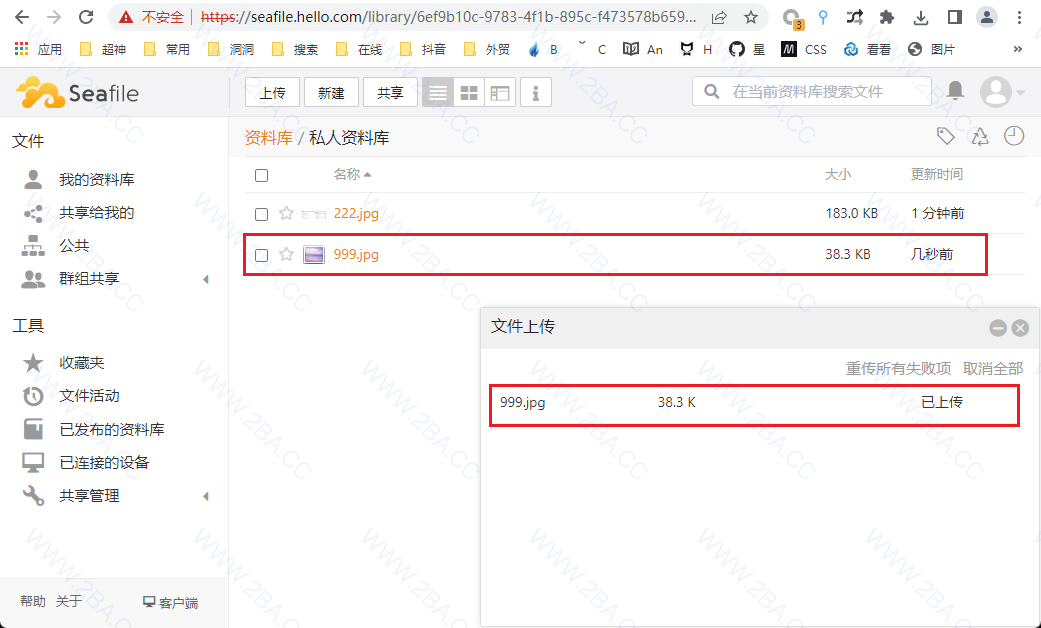
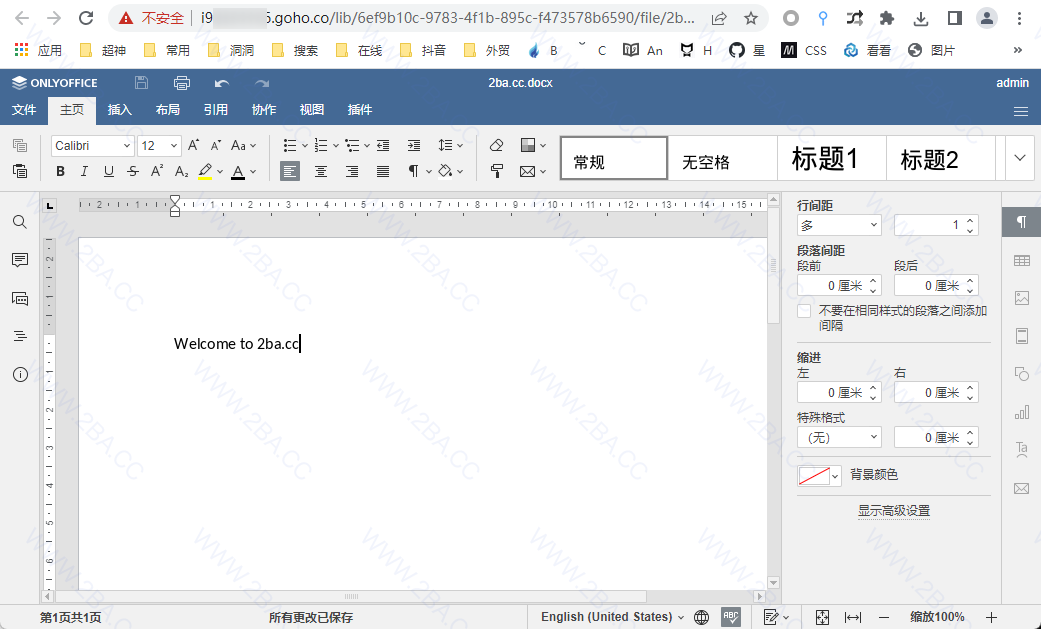
经测试旧域名正常使用(上传/下载/预览编辑文档)
https://seafile.hello.com/
经测映射域名正常使用
https://xxx.goho.co/
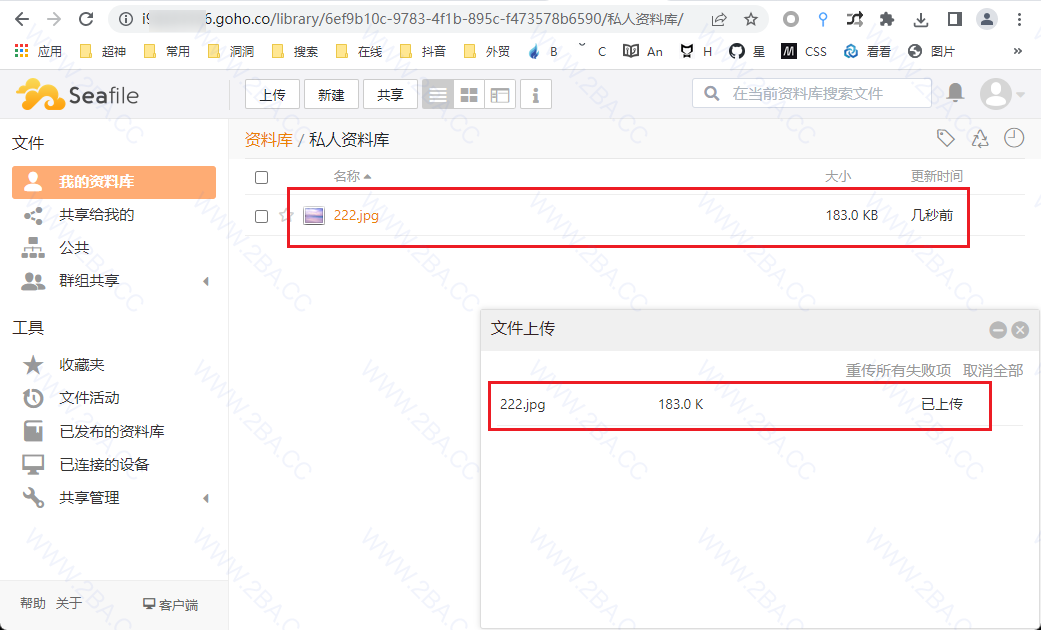
查看编辑文档正常
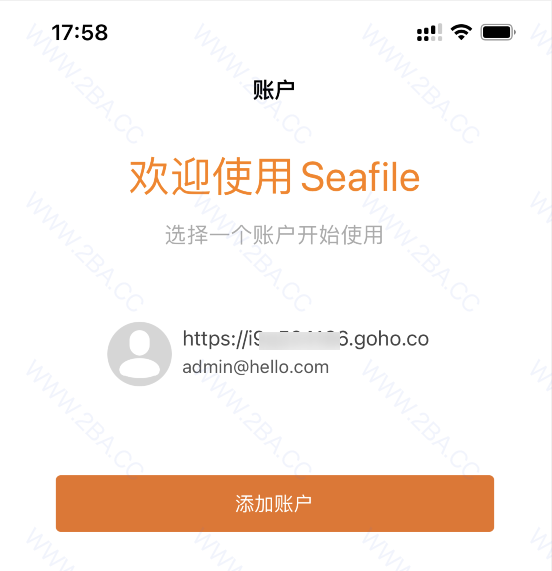
手机APP均正常使用
本文链接 点击前往